Apple Pie?! What?!
I know. I know. I know.
Not exactly the healthy recipe I normally post.
But let’s face it. It IS that time of year when it’s socially acceptable to have that spoonful of icing (and obviously the sprinkles too) when you’re making Christmas cookies.
Or perhaps, when that gigantic tin of popcorn shows up at work–maybe you don’t feel so guilty about having that “tiny” handful.
After all, indulging is all part of the holiday season, isn’t it?

This is my favorite time of year. Don’t lie–you know when “Cheeestnuuuuts roooooaaaasting on an open fire,” comes on the radio, a smile crosses your face and you feel all warm and toasty inside just like I do. (I secretly preset the Christmas station on my car radio starting the day after Halloween.)
If you know me at all, you know I love the holidays.
I love the cheerfulness, the wintry Christmas tree smell, the family time.
But one of the reasons is because it means I can start making apple pie. I feel like most people are making pumpkin or pecan pies this time of year, but my holiday staple dessert is always apple pie.
I mean it DOES have fruit in it right?! What can be so bad about that?! (And maybe you put a scoop of vanilla ice cream on top so that it melts into the crust—hey I’m not judging here!)


I do have to say though—MY apple pie is a lot healthier than most of the recipes you’ll find out there.
Come on, you didn’t actually think you were going to get away with something unhealthy from this website did you?!

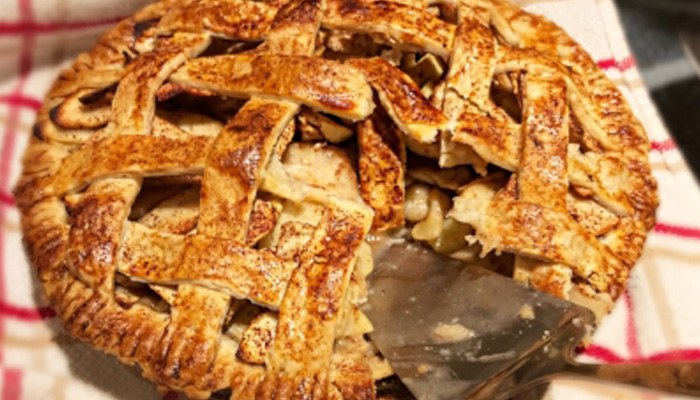
The lattice pattern is so easy to make. I know you won’t believe it until you actually partake in the recipe, but the crust looks so spectacular that everyone will oooooh and ahhhhh over how you made it while you’re secretly smiling inside because it took you no time at all to prepare (it’ll impress the most critical of in-laws, I promise).

This apple pie is a delicious slice of heaven. AND has half the fat and calories of standard recipes!
Come on! What more could you want from a pie?
Yields: 8 slices
Prep Time: 30 minutes +1 hr to set | Cook Time: 1 hr | Total Time: 2 hr 30 min
Ingredients:
~2 cups flour, +1 tbsp
½ cup butter
½ cup ice water
6-7 granny smith apples, peeled, cored, and thinly sliced
1 cup granulated Splenda
2 tsp cinnamon + more for topping
1 egg to brush
1. Place 2 cups of flour (reserving 1 tbsp) in a large bowl. Add in butter and mix until it resembles coarse crumbs. Stir in water a tbsp at a time until well mixed and forms a ball.
2. Divide in half and shape into balls. Wrap in plastic and refrigerate a minimum of 1 hour.
3. In a large bowl, combine sliced apples, sugar, 1 tbsp flour, and cinnamon. Mix well and set aside.
4. Preheat oven to 400.
5. Using rolling pin, roll out each ball of dough to fit over a 9-inch pie plate with about ½ inch overlap. Place one piece of dough in bottom of pie plate for the bottom of crust.
6. Add apple mixture to bottom pie crust. Set aside.
7. For lattice top, cut remaining dough into long (the length of the pie plate) 0.5-1 inch wide strips. Place ½ horizontally over the top of the pie and the rest perpendicular to first strips. Weave over and under every other strip to create lattice pattern.
8. With a fork press strips into edge of crust to seal.
9. Break egg into a bowl and whisk. Brush over top of pie crust.
10. Mix 1 tsp Splenda and 1 tsp cinnamon together and dust over top of pie.
11. Bake at 400 X 15 minutes
12. Decrease oven temp to 375 and bake X 45 minutes.
The Cook’s 2 cents:
· Refrigerating the dough helps to make the pie crust flaky. Refrigeration also helps the dough to not shrink when rolling out. Don’t skip this step!
· When I make this for the holidays, I make the dough first thing in the morning so that it sets in the fridge. I would refrigerate for a minimum of one hour, but if you want to make it ahead of time, you can keep in the fridge overnight.
· Baking is difficult. The ratio of flour to water changes very easily. If you are making this in a humid environment, you may need less water. In the winter (when its typically drier), you may need more. That’s why I suggest adding a little at a time until it’s mixed well and holds together. Keep in mind though, that it shouldn’t stick to your hands once it’s mixed well. (If it does you may have added too much water–easy fix: add a little more flour.)
· After it’s cooked, let it rest prior to serving. I know it will be hard to do, but trust me it will be easier to slice after it cools.

Nutrition Facts:
Serving Size: 1 slice
Servings Per Recipe: 8
Calories: 191 Fat: 11g Sodium: 90mg Carbs: 25g Fiber: 6g Sugars: 17g Protein: < 1